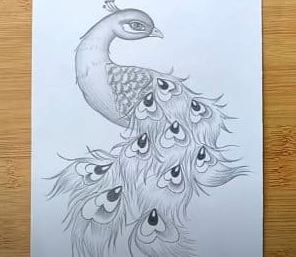
Step By Step Instructions To Draw A Peacock With Pencil. The most effective method to draw a Peacock with Pencil is simple with this how-to video and bit-by-bit drawing guidelines. Instructions to Draw a Peacock – Step by Step Guide. The peacock, otherwise called a peafowl, is a medium-sized bird that possesses tropical jungles with warm environments.
They are primarily known for their unmistakably bright tail feathers, which spreads into a glorious fan that includes the bird’s back and contacts the ground, one next to the other peacock Drawing.
Thus, here we will be; we have made a bit-by-bit instructional exercise on the best way to draw a pencil peacock drawing summarized in 20 speedy and straightforward advances.
Instructions To Draw A Peacock With Pencil.
Step 1
Begin by drawing two bends, generally around an oval. These lines will frame the peacock’s head.
Step 2
Draw a topsy turvy, bent triangle to frame the upper piece of the snout. Draw a nostril on the bill with a short bend and encompass the lower part of the nose with an angle.
Step 3
I extend a long and short bend from the top, laying out the effortless bent neck.
Step 4
Define a long and bent boundary from the neck. As far as it goes, draw the quills utilizing the associated “U”- formed lines. Add more plumes to the bird’s back using “U” molded lines of various sizes.
Step 5
Draw a long topsy turvy “U” shape to diagram the part close to the wing. Wrap the state of the branch utilizing associated “U”- molded lines to shape feathers.
Step 6
Add subtleties around the bird’s body and neck utilizing little “U”- formed lines. Permit a few lines to interface with others.
Step 7
Draw more plumes close to wings utilizing the associated “U”- molded lines.
Step 8
Begin to portray the peacock’s long and streaming tail. Ranges two joined bends of various lengths, permitting the lines to meet at rugged places. Between these lines, stretch angles of different distances from the bird’s body.
Step 9
Proceed with the arrangement of bends, interfacing on each side, inside subtleties of the tail area with bent lines of various lengths.
Step 10
Proceed with the tail lines utilizing the bends, combined at rugged places. Permits lines to join at a certain point, around the tail.
Step 11
Draw a few ovals close to the foundation of the tail. In these frameworks, the peacock’s eye focuses. Add a couple of more bends to the surface.
Step 12
Keep drawing oval eye focuses in the focal point of the tail.
Step 13
Add extra oval eye spots until the whole tail is loaded up with these spots.
Step 14
In each eyepoint, draw a circle. In each process, attract a circle the state of the letter “W.”
Step 15
Draw the far wing utilizing a bend. Using the “U” formed lines, add a few flying plumes to its head using the “U” formed lines.
Step 16
Give the peacock a roost to rest. Stretch a bunch of equal bends on each side of the tail. These lines structure a tree limb. Add a couple of turns along its length to provide it with the surface of the wood. Draw a slight bend between the branch and the wings to show the bird’s feet.
Step 17
Draw the peacock’s eyes utilizing two bends, permitting them to meet at a point on each end. Draw an arc through the eye to cover the understudy—Mark your eyes with two little circles. You are concealing between the line and the circles.
Step 18
Draw bends for the snout and eyes.
Step 19
Draw the quills on the peacock’s head. Draw many arrangements of bends stretching out from the highest point of the head. Then, draw a circle on top of each sequence of lines at that point.
Step 20
You are shading your grand peacock.
Also read: Product Image Design Tips for Non-Designers